Friday, July 5, 2013

Skirts made using patterns by Serendipity Studios

I ordered Fashion Formula Skirts Mini Books from Serendipity Studio and went on a sewing bender. Kay Whitt has a lot of great ideas in her books, especially for sewers who come from a quilting background. They do not contain pattern pieces. All cutting is made with measurements calculated, based on your hip size.

Since I'm addicted to prints, this was a great stash buster. (Who am I kidding? I bought MORE fabric to make these. Sssshhhh.)


The red blouse is another McCall's M6653 Misses' Top using embroidered cotton from Fabric.com. 
The skirt with godets is made with prints by Anna Maria Horner, Innocent Crush "Slowdance Vintage" and "Mixed Signals Summer" quilting cotton.


These prints are by Valori Wells, Wrenly "Ingrid Gypsy" and "Boho Stripe Cerulean".


This pleated one is made using Anna Maria Horner's Loulouthi "Summer Totem Grapefruit" and "Framed Shadow".


This godet skirt uses linen / cotton blend fabric by Valori Wells, called Jenaveve, "Floral Birds Merlot" and "Leaves Merlot".


This pouf skirt is made using cotton voile by Valori Wells from her Cocoon collection: "Metamorphosis Bittersweet" and "Liv Sapphire".


This faux wrap skirt is made using Amy Butler's Soul Blossoms - "Sari Blooms in Moss". It was cut on the crossgrain to take advantage of the border print. This can be made very quickly.

Who cares if I look like a walking sofa?

Friday, May 24, 2013

McCall's M6653 Misses' Top using Denyse Schmidt Cotton Voile

I have been so determined not to purchase any more clothing. I have been spending all my spare time making more items, so I can wear something me-made every day of the week at work. I owe this all to the gals over at Join the Challenge: Sew Your Own Wardrobe For a Year! They rock! Check them out and get inspired!

I made this blouse just in time for hot weather. This was fun and a breeze to put together.


This is McCall's M6653 Misses' Tops pattern. I made style B. Although the pattern picture is rather dressy, I thought the silhouette looked casual. Is that a drawing of a Flashdance sweatshirt? This is really versatile, depending on the fabric used. Instructions suggested lining, but I will wear a small knit top underneath, so I did not line mine.


I didn't have a clue how this would look on my body, so I made a muslin. It was a pleasant surprise!


The pattern layout indicates that the blouse should be cut on the cross-grain. When I went to pick out fabric, I eliminated several voile prints with a vertical direction (mostly flowers). I didn't think they'd look good growing sideways.

The fabric I chose was Greenfield Hill Voile - "Blueberry Coterie" by Denyse Schmidt for Free Spirit. This geometric print looks good no matter how you cut it. I think I got it for $9.00/yard on clearance. Oh, yeah!

Without a lining, I needed to finish the raw edges at the neckline, sleeves, and waist. I chose to finish all the edges with bias binding, using the same fabric. To match the look of the bias binding, I flat felled all the seams.


This turned out so well, I made another one of this pattern, but I have not taken a picture yet. What a feeling!

Now, what are you making? I'd love to hear!

Friday, May 3, 2013

Vogue V2948 Misses' Pants Today's Fit by Sandra Betzina

This is the best fitting pair of pants I have ever made!


The pattern is: Vogue V2948 Misses' Pants Today's Fit by Sandra Betzina.


I was going to link to Vogue, but as of right now, this pattern is no longer listed in Today's Fit or Out of Print. Fortunately, if you take either of Sandra's Craftsy classes,  Pant Fitting Techniques or Pant Construction Techniques, it comes free with the class. I took both classes, so I happen to have an extra copy of this pattern. If anyone wants the pattern, just email me. It includes all sizes.


I was excited to see the measurements on the pattern back, with more realistic sizing. For most pattern companies, I'm a size 10 in bust, 14 in waist, and 12 in hips.  I do not have 10+ inches difference between bust and waist! Why do they make patterns like that? In Today's Fit, I'm a straight size B. Letters sound so much better, I think.

With help from the ladies at Sew Your Own Wardrobe For a Year Challenge, I mustered up the courage to make these. I kept watching Sandra talk about them, and her samples in class looked great in many different fabrics.

I did worry that this style, with the extra seams in the front and back leg, would look kinda weird on me. Somehow, it works, even if you don't want to draw attention to them. Sandra had variations using piping, fabric strips,  flat felled seams, and decorative / topstitching.

The construction order makes perfect sense for fitting as you go. You can take in more at the side seams after applying the waistband for a better fit. That's exactly what I needed.

I bought this weird fabric on clearance at http://www.fabric.com. Supposedly it's stretch cotton with some metallic thread thrown in there. I fully expected it to catch spark in the dryer. It looks really flashy, maybe only appropriate for a Christmas party. I thought it'd make a great test garment. The fabric texture is the same on the front and back. It took awhile for me to figure out how to cut it, because I wanted the weave to be a mirror image on the front pieces, to make it more flattering.

Here's the front before pressing the pockets. I love these pockets.


And here is the back view. I really dig her idea of using a tab to keep that zipper in check. There really is an invisible zipper in there. I can hardly believe it myself!


Now, I need to find some better fashion fabric to make another pair for work.

Thursday, April 25, 2013

McCall's M6437 Misses' Top with Belt using Cotton Voile

This project was a disaster!  I would definitely consider this worthy of Stitch-Slapped Fridays.


The only reason I picked this pattern was that I cover up my torso and arms at my office job, and I thought this silhouette was different than the typical button down or turtleneck.
Now I'm thinking I should stick with the basic styles instead of this foo-foo. I should have known better when it said "Laura Ashley." Doh! I'm a tomboy. But I love pretty fabric!


I think the biggest problem for me is looking like I tried too hard.
I usually dress dowdy for this very reason, whether I make the clothes myself or not.
I don't even want to attempt to dress up, because I can't walk in high heels, and I feel awkward and embarrassed. Maybe if I did it more often, dressing up would become more comfortable.
I don't want to appear as if I do not take care of myself, but I don't want to make a major fashion faux pas, either.

This probably goes way back to my early attempts at dressing up and fitting in.
I was dressed as a boy most of my childhood, but when I went to grade school, I remember picking out a flowery gathered skirt that I actually liked, and I wore it to school. I remember a girl pointing and laughing at me in the bus line because I was wearing it with the zipper dead center and FRONT. She said it was supposed to be in the back. That made no sense to me.

I thought that was a BIG deal, because I had been wearing it for awhile, and no one else had told me. No one was mean, but it was one of many mortifying situations in dressing myself.

Well, back to this blouse...
I think it would have been fine if I had picked design A or B. I picked D, but I wanted to use B length sleeves with the D cuff to cover my arms, and it looks weird.


The collar is downright medieval! I didn't even pick the highest collar! I don't understand why suck a high collar would be on a blouse with short sleeves, as in C. It's like hiking in a sweatshirt with short shorts.

The muslin fit fine, but I wasn't sure about the styling. I should have trusted my gut right there and then.


I was hoping it was just the muslin talking, but the collar in the final garment is stiff and ridiculous looking.
I did learn a few things, so it wasn't a complete loss.

I used this beautiful voile, Turn of Events in Indigo by Anna Maria Horner, part of her Innocent Crush collection.

The front and back of the bodice are cut on the fold. Since I was using 54 " width of fabric, I finally figured out that the best way to cut out the pieces would be to fold the selvages in to the middle. I don't think the instructions indicated this option, but maybe I missed it. I was glad to save some fabric.


I really hate gathering by bobbin thread. Is there really any benefit to buying a gathering foot, or would it gather too much? What if you can't predict the ratio of fabric needed to gather into a smaller seam? Is there some sorta standard?

I was worried that the voile might be too delicate for the collar, so I made the decision to use some Kaufman Kona solid black quilting cotton for the collar and cuffs. I even stopped and  prewashed the fabric! I used the wrong fusible interacing - a woven kind for collars and cuffs. I turned out too stiff! I think I should have used a more lightweight kind. Then, on top of that, when I washed it, the interfacing shrunk. I should have read Peter Lappin's blog post sooner! Pre-Shrinking Interfacing or "D'OH!" Now I'm torn about trashing all this fusible and getting sew-in interfacing or trying some other suggestions. What do you do to prevent bubbles and shrinking?


I practiced making button loops, too. Oh, joy.


I am hoping to rip off that collar and salvage that gorgeous voile for another day!

Monday, April 22, 2013

McCall's M6515 Misses' Pants

I joined the Challenge to Sew Your Own Wardrobe For a Year! Check out their blog and take the plunge! It is very motivating. I need more work clothes, and I refuse to buy them! So here goes...


I usually avoid JoAnn's for quilting cottons, but I found some nice apparel fabric there on sale. I purchased some purple stretch linen/cotton, red bottomweight stretch sateen, and brown pinstriped stretch cotton. Each had just a percent or two of lycra or spandex. My hope was that if I sewed the pants too tight, the little bit of stretch would help. It is so hot here in the south, I avoid polyester altogether. When I asked if they carried any rayon challis, they looked at me like an alien. Very strange. I must learn where to get good fabric! Where do you get yours? Online?

To help me get my bearings, I signed up for Sandra Betzina's Pant Fitting Techniques and Pant Construction Techniques Craftsy classes. When there was a sale on classes, I grabbed 'em! They are a great resource, and I have enjoyed comparing Sandra's techniques to Kenneth King's class. Of course, pants are not jeans, but I've seen a little bit of overlap in discussion, and I loved all the classes. I go back in and replay sections for reminders.

Now, Sandra had some good advice about avoiding stretch fabric that stretches out and doesn't return to its regular shape. I don't want to have baggy butt and knees after sitting in stretch pants, so I took that to heart and decided I would sew the sides in more if needed, as she recommends.

I had a pattern, McCall's M6515 Misses' Pants, and it seemed doable.

I made a muslin pair of shorts without a zipper, just to check the fit. It seemed to fit well, but I still worried about the difference in using stretch fabric. I'm a size 12 but I'm so short, I need to shorten most pants by 1 inch in the crotch and a little more in the leg.


First, I made the purple linen pants. I thought I'd go crazy and flat fell the outseams. That went well until I hit the part where the side invisible zipper goes. Oh, well. Just a little wrangling in there, and it's not too bad. I love to use my Blindstitch #5 foot for that. (I don't have a #10 Edgestitch foot. Can anyone tell me the difference?)


Then, I hemmed, using a blind stitch. The linen does a great job at hiding the stitches, unlike my later fabric choices.


I thought I'd be like Angela Wolf and use a fun cotton print for the waistband facing. In my haste, I totally spaced out pre-washing it. Doh! It shrunk in the wash, but miraculously they still fit. Maybe the loosey-goosey  hand sewing to attach the facing to the inside helped some. That was no fun.


I liked this pattern enough, I made them in the red and brown pinstripe fabrics, too.


For these two, though, I  attached the waistband facing by topstitching the front. I pinned from the inside and stitched on the outside to close it up.


Maybe next time, I'll be brave enough to show you the zippers.

Monday, April 15, 2013

Corduroy Pants Using Kenneth D. King's Jean-ius Craftsy Class

I have always been disappointed in my attempts to sew apparel, so I have been trying to learn more from online instructors and video demos. They all seem a little different in their approaches, so maybe I need to just keep it simple instead of wanting to know all the different ways to attach a collar or set in a sleeve. I've been watching methods used by Sandra BetzinaPeggy Sagers, and Angela Wolf. Who else would you recommend? Do you have a favorite method for particular techniques?


I saw Kenneth D. King on Threads, and I really enjoyed his approach to lessons. Even though I dress very casually and have no interest in wearing designer dresses myself, he is very helpful. When I saw he has a Craftsy class, I signed up immediately. The class is Jean-ius - Reverse Engineer Your Favorite Fit. This class is so good! I read in the comments that Kenneth was asked to do a future class, most likely on jackets. I can't wait!

At the same time, I stumbled on some silly, crazy corduroy fabric, and I joked with my husband that I should make him some pants with it! It's Robert Kaufman's Cool Cords 21 Wale Brown Argyle by Ann Welle. This fabric is meant to be used in children's clothing, such as M6575 Infants' Hats. For adults, it screams HIPSTER. Eek! Oh, well.


My dear husband has a great sense of humor, so I figured worst-case scenario, it would make a great toile test garment. Best case scenario, he'll dance around the house and perform karaoke to Steel Panther (probably NSFW)!

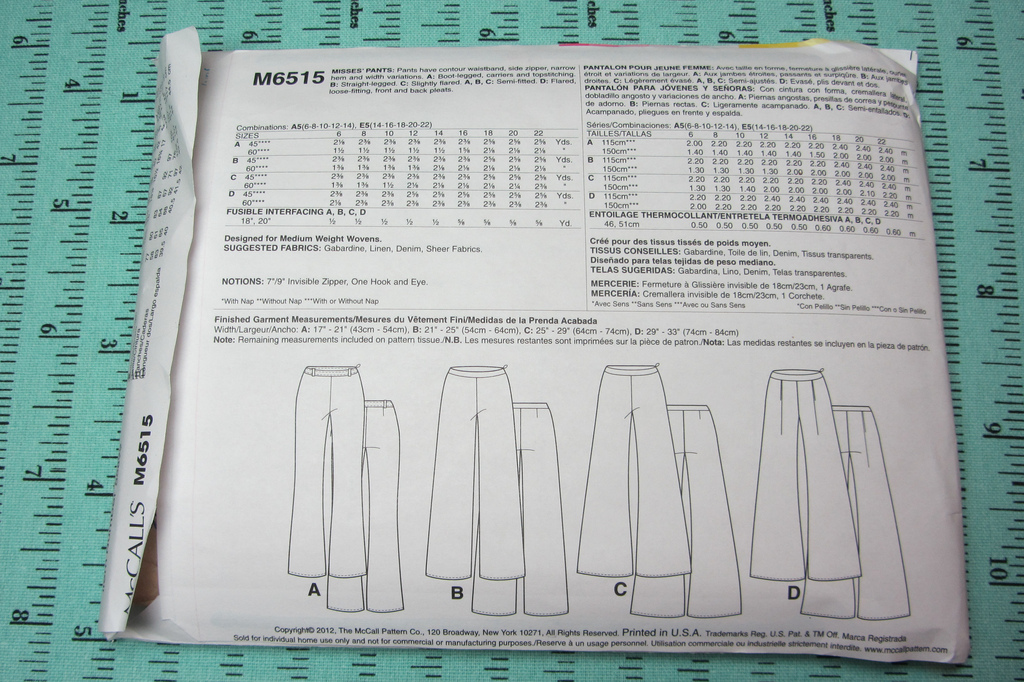
He showed me his favorite jeans to copy, and I followed Kenneth's step-by-step instructions. This class was so helpful, from drafting, to pattern alteration, all the way to full construction. Fantastic!

The only thing I did not follow was using basting thread to mark all the seams and grain lines on the original jeans. After breaking my wrists, it is very difficult to push a hand-needle through jeans for so long. If you have any tips on what type of needle would be easier, I probably need help with that. Instead, I used the rub-off method. I heard about this technique from 
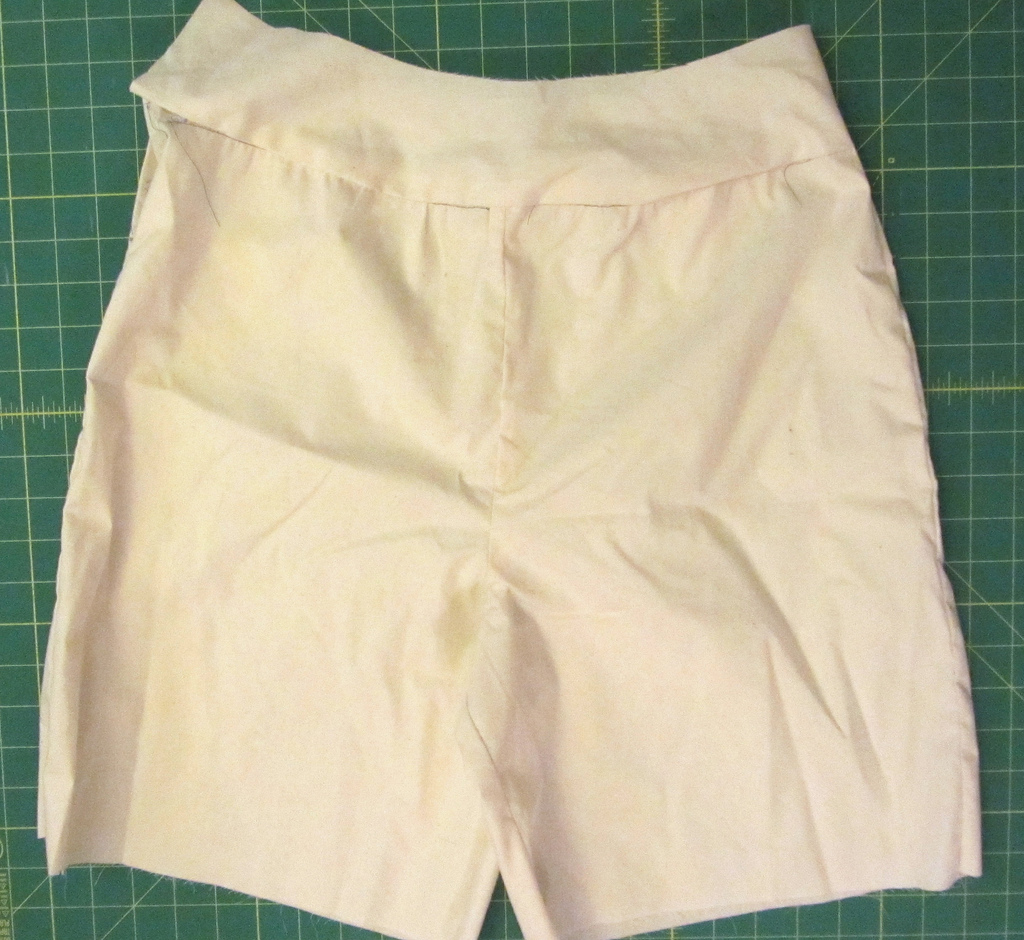
Steffani Lincecum. I just hoped I could be accurate enough for it to work on these jeans. Here are my pattern pieces:


I struggled with tracing the jeans because they were so worn in that they were distorted to the point that both sides were not symmetrical. I went back and forth trying to decide which side I should trace, especially on the front. The zipper seemed crooked, but my husband loves the fit, and I was too lazy to draft two fronts and two backs, so I kinda averaged them out. Kenneth's instructions are so detailed. I love when he says to "mark everything as if you will be struck with amnesia at a moment's notice." This worked wonders! The pattern creation portion of the class was worth it alone. On top of that we got step-by-step construction demonstrations:. how to make the back pocket, front pocket appliques, front pocket bags, watch pocket, back yoke, fly shield, zipper, etc... Fabulous!

Even though I was too lazy (actually fearful and doubting this whole process) to draft two asymmetrical fronts and backs, I did want to match those damned argyle patterns. I cut two separate fronts and two separate backs and tried so hard to match everything. BUT I FORGOT ABOUT THE BACK YOKES! AAAAAAAHHHHHHHHH!  Bummer. I had never made pants or jeans with a back yoke, and I completely spaced out about this extra length at the top of the back. This shifted all my matching patterns down by more than an inch. What a letdown. I almost quit at that point, but my husband didn't seem to mind. What a sweetheart.


I didn't match the back pockets, because they were not on the same grain as the back pants. 
Do you just cut them on the same grain anyway to match?


I did manage to match the front pocket appliques to the front pants, but I drafted the appliques too short. I should have made them go deeper into the pockets.


I used a really bright orange zipper. It is too close to the edge to be completely hidden by the fly front. I need to set it in more next time.


This fabric is stretchy, and it's not strong enough to really act like jeans, but they were fun to make.


Hopefully, next time with real denim, this will turn out better. 
I'm learning even more by reading You Sew Girl's blog about making jeans. She has some great tips and techniques, especially the stitching on her back pockets!
One more resource I found came from a company in New Zealand: Ande Whall Denim Co. has step-by-step pictures of how they make jeans, including hand felled seams.
Do you have other resources for pattern drafting from RTW or jean construction? I'd love to hear about it.

Now, I'm going to try this technique on a pair of jeans for myself. I joined the challenge: