Thursday, December 29, 2011

Baby Cowboy Booties

I finished these in November, but I'm just posting about them now. Several friends are expectant mothers, so when I saw this pattern, I just had to try these!

Quilted Baby Cowboy Boot Pattern
by Curby's Closet
I ordered 1/4 yard each of these 3 fabrics, and I messed up right away by not specifying fat quarters. Then, I prewashed the fabric, and it shrunk even more!

I wanted to vary the prints on the sides and bottoms of the boots, but there was not enough to layer for quilting and cut out right side up motifs on the pattern.

 So, I did not mix the fabrics as I had hoped. I just layered the quilt sandwiches with same fabric, so the right side here is on the fold:


I quilted one fabric layer with a decorative stitch:

Michael Miller Yippee Cowboy Retro


For the other two, I tried free-motion quilting around the motifs.
I used Madeira Rayon variegated thread to simulate rope.
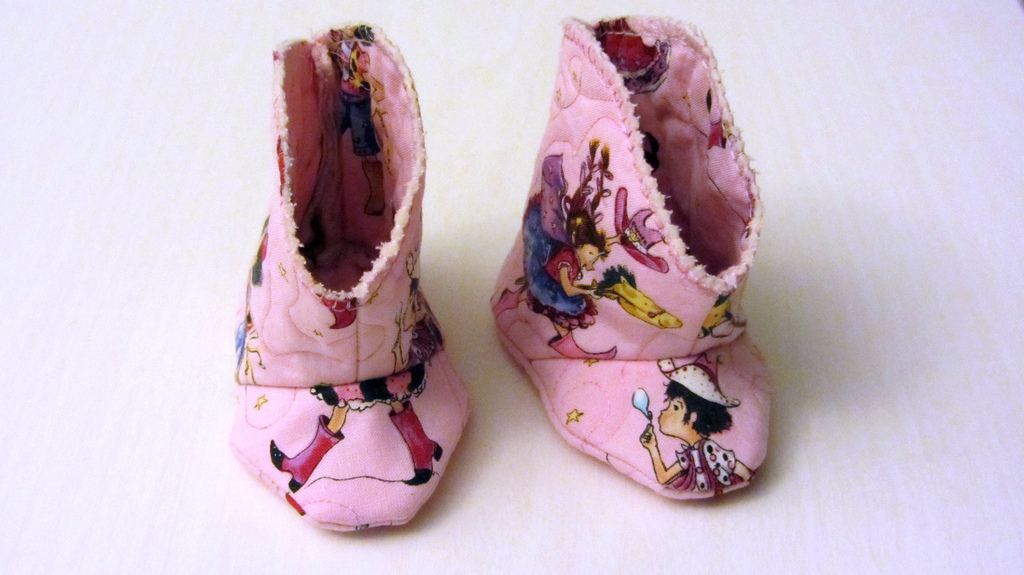
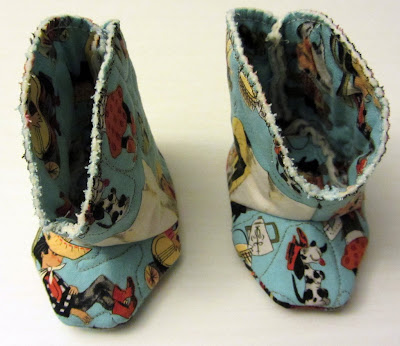
Michael Miller Kids Chuckwagon Sky Blue


Pink Pair


Blue Pair


Orange / Yellow / Blue / White Pair


I don't have any pinking shears yet, so I stitched around the tops with a machine applique stitch.

I really wanted to add more fun to these, but I ran out of time, and I wanted to avoid anything that might be a choking hazard.

Next time, I will probably:
  • add bootstraps on the sides, as the pattern suggested
  • use a contrasting fabric on the toe, bottom, and/or inside
  • line the boots after quilting to hide the raw edges inside
  • use pinking shears to finish the top edges, to save time
Any further tips or suggestions on construction are welcome.

Have you made these particular booties? Do you have other baby patterns that you like?
I've got the urge to make all kinds of cute things and no kids of my own!
Can I just skip to being a Grandma?

Sunday, December 25, 2011

Terrain Quilt Top Progress on Christmas Eve


MERRY CHRISTMAS AND HAPPY HOLIDAYS TO ALL OF MY SEWING BLOGGERS!
I'm learning a lot from you!

With a day off work, I decided to get busy sewing the last row of blocks on this quilt top.


It won't be done in time for Christmas gifting - it may not even be done by next year! - but I'm afraid if I don't finish it now, I never will!

The layer cake of Kate Spain's Terrain fabric did not contain the fabrics in the picture for this Stepping Stones pattern, so I had to improvise. Yikes!

I do not understand color and light. I chose this pattern for the optical illusion, because there's no way I could ever come up with something this cool on my own!

Luckily, my dear husband helped me pick out remaining squares to use for the colors suggested.


I added the black border and stopped. I do not have any more fabric to do the suggested extra border around that. Do you think I should?

This is getting so big, I just don't understand how anyone makes bigger quilts! Whew!

Now I need to pick out 4 yards of fabric for the back.

Would you suggest black? Or yardage of one of the Terrain prints? I can't decide.

Next comes the basting. The basting spray I tested on smaller squares didn't seem to stick enough to work. I think I'm going to have to pin baste on the floor. Does anyone pin baste on a table starting from the center, if the floor is too small or has pets not willing to vacate the area?

And then, how will I quilt it? I am really digging the black pattern, so I may stitch in the ditch around the black to outline it.

Take care. {{{hugs}}}


Friday, December 23, 2011

"Shirt Off My Bag" Tiny Tote Bags from Fresh Fabric Treats book

Fresh Fabric Treats book has some great projects using Moda fabric jelly rolls, layer cakes, etc.


I used a layer cake of Deb Strain's Meadow Friends fabric by Moda.
My First Tiny Tote

As soon as I saw the project for the "Shirt Off My Bag" Tiny Tote, I knew I had to have it! I have made almost a dozen of them for holiday gifts.

More

More

They're Multiplying!

I made a few modifications to the instructions:
Stay Stitch the inside lining to get a crisp top edge.
  • I edge stitched the front placket and collar points.
  • I stay stitched the top of the lining to the inside seams. 
  • I added a "collar" to the back of the shirt (bag) using the same fabric that was used in the collar.front prairie points. I cut a strip of fabric from the same layer cake layer 10" X 2". Then, I folded it in half, edge stitched, and sewed to top of shirt (bag) before handles were attached.
  • The buttons looked too close together when specified as every 1". I sewed the first button 1 1/2" from the top and then the remaining 4 were placed 1 1'4 inch below the center of the button above it.

Use a seam roll or pressing ham to press afterward for a nice finish.
I will make more of these again.
I would also consider using fabric and buttons from a real shirt, previously worn by that special man in your life. 
First I gotta find the one without tomato sauce. ;?p 

Stepping Stones Project Sheet with Terrain Kate Spain Fabric

I saw the quilt kit online for Kate Spain's Terrain fabric and fell in love!


You can get this pattern - Stepping Stones Project Sheet free at Fat Quarter Shop.

Instead of buying the quilt kit, I bought a Layer Cake of Terrain, so I could change the white to black.


It was slow-going at first, because I was quite confused. The last 4 blocks, I was able to start piecing at the same time. I'm almost done...


If I can get this done, I hope to try her Good Fortune Pagoda quilt project next!

My New Iron!

My DH surprised me a new iron!

We talked about getting an Oliso Smart Iron, but the Panasonic Cordless 360 Degree won in the end. Here it is on its base. The cord retracts and wraps around the base. It also has a cute top with a handle, so it can be carried.


Cordless Iron Resting on its Base

I'm left handed, and DH is right handed. Our sewing stations face each other, so this fits perfectly on one side where we can both use it!

It heats up fast and stays hot off the base for awhile

I can't believe how lightweight it is! I had been using a few Rowentas for years, and this one is so easy to hold and move. I was worried it might not be as good because the Rowenta I had was 1600W and this one is only 1500W, but so far, so good. Maybe that's due to that shiny new soleplate...

Soleplate

Thursday, December 22, 2011

Elvis Pillow Covers

Elvis has left the building...

These 16" square pillows are a gift for a dear old friend.

The covers have zippers, so they can be removed and washed, since the owner has 2 cats.

I really wanted to add red pom pom trim, but I was afraid the cats would try to eat it.

Scroll down to hear my favorite Elvis song.

Elvis Pillows

Stockings for Holidays or Baby Shower

I made these in December 2005 as gifts. They are so adorable and easy!

The stockings are fully lined with matching fabric and batting.

A pocket on the front can be embellished.

I added decorative stitching and snaps to these, just to make it go fast.

The "Bottoms Up!" pattern is still available from Calico Moon.

Cats and Mice

Dogs and Bones